Have you already tried recovering data on your powerful, gaming PC? Well, a laptop is not at all different, and the process is as straightforward and easy as it gets. The only difference would be in processing power, which can make the search a bit slower. However, knowing how powerful today’s laptops are, and if you’re an owner of a newer one – you’ll have no troubles, we’re sure. Luckily, there is a lot of software dedicated to the recovery and repair of accidents and mishaps. That’s in our nature, we as humans make mistakes, and it’s important to have a failsafe.
Is photo recovery possible from a laptop?
This actually depends, and the answer isn’t definitive. Yes, the methods and tools we’re going to talk about now is very thorough and does a deep search for files you deleted. As a result of one fact that you should know, the search can be 100% complete or as close as that. The good thing about it – it depends on you entirely.
We’ve talked about this in other articles, but if you haven’t read them already, no problem, we’ll explain. Once you delete a file from your computer, the file is not gone immediately, only the link to it that the computer created does. This means that in theory, if you act fast, full recovery is possible and certain. First, we’ll get a few suggestions out there.
- Check your Recycle Bin – This might sound obvious and even foolish to you, but you’d be amazed at how many times the files are still there, and we didn’t empty it. If this proves successful, it will save you a lot of struggle and installation. If not, proceed.
- Don’t try System Restore – We know this sounds tempting, especially because the process is automatic unless disabled, it won’t help. You see – it only saves a state of current system files, registry settings and programs at that exact moment, thus having no impact on deleted files.
How to recover deleted photos from a laptop with a backup
To start things off – we’ll consider you’re thinking ahead. That’s because sooner or later, a mistake will happen, costing you your files. Or maybe a hardware issue messes things up, or a virus wreaks havoc on your PC. Whatever the case might be, it’s best to be prepared. Luckily, your own operating system – Windows 10 in our case (as well as the previous version) has an option built-in. We’ll give you a rundown below:
How to create a backup for a Windows 10 laptop
- It’s best if you plug an external drive. This is to achieve the best safekeeping possible, as you can put it away until you really need it. You’ll get the information of storage space your backup will take, so think accordingly. Of course, it’s possible to save it to another drive or a network location. Surprisingly, DVDs are supported as well, although we’re convinced rarely anyone uses them nowadays.
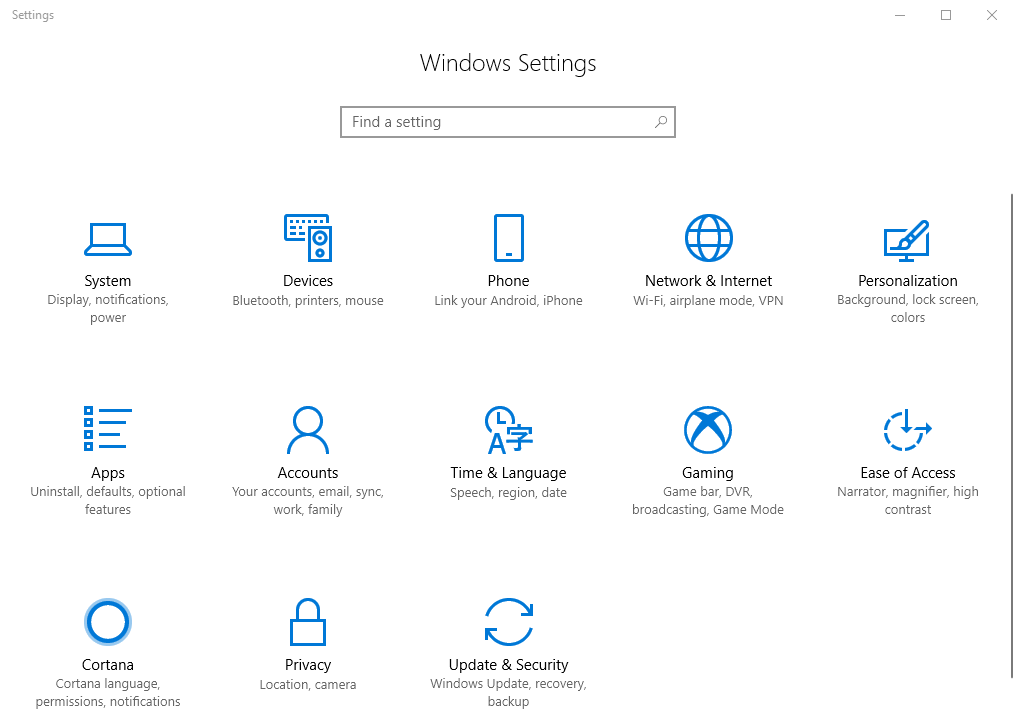
- Open Start, click on Settings and choose Update & Security.
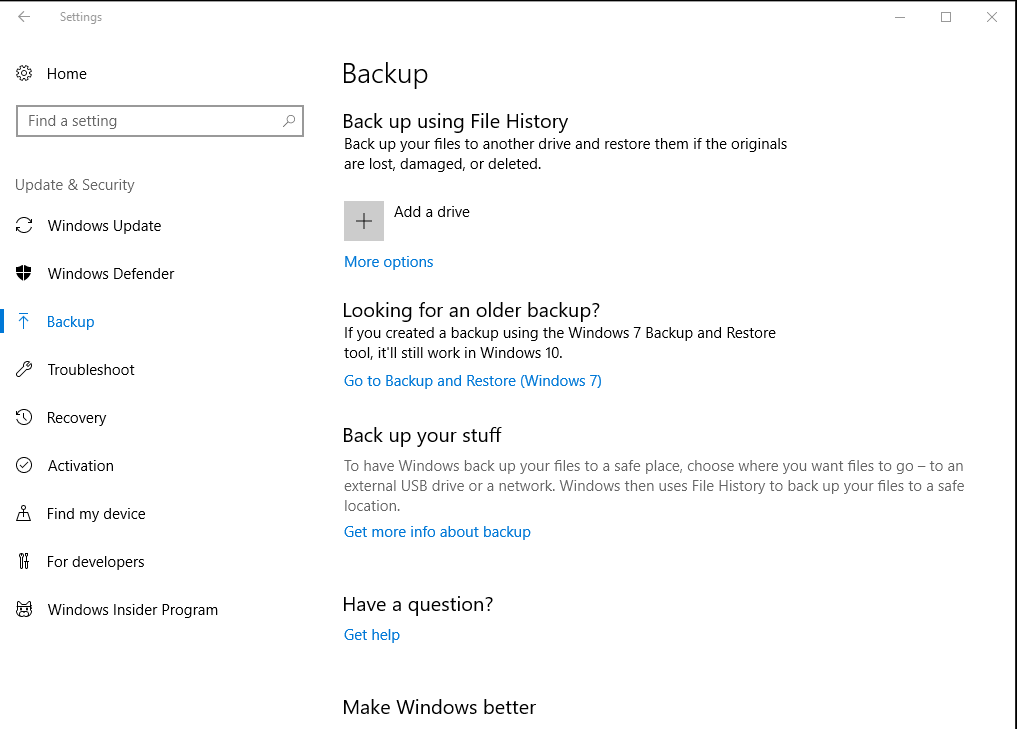
- Choose Backup on the left.
- Press Add a drive. You’ll notice Windows 7 backups are still compatible with 10, which is a relief.
- After you choose a drive and set things up – the process starts. Windows actually uses a Shadow Copy technology – one that allows using the files that are being backed up. This means no downtime on your work, so you can continue as planned.
- Optional: Create a system repair disk. In most cases, there is no need for this, as you can simply plug a flash drive with an installation of Windows 10 if your system fails to boot up.
- Eject the drive and keep it safe.
In case you’re an owner of a Mac laptop, things vary a bit. However, you trust us to write an easy-to-follow and comprehensive guide in the near future.
How to restore a backup for a Windows 10 laptop
Now that you have a backup handy, you should know how to actually use it should the things go very bad – that is, if it won’t boot up. Here are the steps to get it up and running in a jiffy.
- Plug your external drive into a USB slot.
- Insert a DVD with Windows 10 installation. The alternative – plug a USB flash drive containing the same.
- Restart your computer and enter BIOS. Exact key required varies depending on the manufacturer of your motherboard. Usually, it’s either DEL key, F8/F9 or ESC – but you should check for a definitive answer.
- Find Boot Priority, and choose the USB drive containing Windows 10 as first. Save and exit.
- Your computer will enter a Windows Setup page. Click Next.
- Click on Repair your computer at the bottom left.
- Choose Troubleshoot, and then System Image Recovery.
- Now, choose an operating system. In our case, that’s Windows 10, the only option.
- You’ll be lead to the Re-image your computer page. You should select Use the latest available system image and press Next.
- Optional: Choose to format and re-partition disks. This will, of course, format and wipe the data previously there.
- Click Next, then Finish and confirm that backup will be placed on instead of the data already there.
If both of the above methods fail to restore your laptop, you will have to proceed to the next method, which is trying things without a backup.
How to recover deleted photos from a laptop without a backup
The situation is a tad more difficult, but far from unsolvable. There is plenty of free data recovery software around, and as an example, we’ll use Piriform Recuva. They’re the creators of CCleaner, another familiar and useful utility designed to keep your laptop and PC in the best shape possible. You can use any tools you would like though. These are the steps to recover your deleted laptop photos using Recuva –
- Download Recuva and open it. You’ll be met with a window much like CCleaner.
- Choose the sort of files you’re looking for. This means – pictures, music, documents, emails, and others.
- Click Next and let it start the scan, then wait until it finishes. This can take a bit longer if there are a lot of files discovered.
- Take a good look at the end results. You’ll see a long list of various files, and now it’s up to you to decide what should be salvaged. Check the files you want to keep.
- Right-click and choose Recover Checked.
In the end, the choice is yours entirely. If you don’t like Recuva’s interface, or it simply wasn’t able to find what you’re seeking, maybe you should give EaseUS Data Recovery Wizard a try. We’ve reviewed the program for your convenience, and it might be a better fit for you. Good luck, and I hope your files stay safe from now on.
What to do if you cannot retrieve the deleted photos from your laptop?
If you are not able to find or restore the deleted photos even after several tries, it is possible that the data is already got overwritten by new files. Using the laptop for a while after those photos were deleted will be the reason for that. If you are absolutely sure that you didn’t use your laptop much after the incident, your next best bet is letting an expert take a look. You can find a data recovery service near you to let them take a look. Make sure that the service you are choosing is trusted.


