Microsoft Excel has more than 800 million users worldwide. Working in Excel is typically meant for people with a clear goal. Those can be accountants, human resource managers, business analysts, financial analysts, but also students and people who like to keep their life tightly organized. Regardless of the purpose, losing a file you worked so hard creating and organizing can be a huge blow to your mood and daily schedule. Luckily, Microsoft has had plenty of time to come up with solutions.
Even if those fail, there is file recovery software you can try, so you shouldn’t feel so down. We’ll teach you how to recover an Excel file, or at least give you the best chance to do so. These are the 5 methods to recover Excel files –
Method 1. Check your Recycle Bin for the deleted Excel file
This might sound foolish, but is sound advice. It only works in the case you accidentally deleted the file, though. Simply open your Recycle Bin, and look for a Microsoft Excel file, typically with the extensions XLS or XLSX. If you locate it, right-click on it and choose Restore. If you use Shift + Delete to delete the file, or accidentally formatted the drive, only data retrieval software will help you, which we’ll cover last.
Method 2. How to use Document Recovery in Microsoft Excel
Document Recovery is your first line of defense after a power outage, system crash, hardware failure, or even if only Microsoft Excel crashed. The process is simple.
- Open Microsoft Excel.
- At the welcome page in the left tab, you should see two sections, Recovered and Recent.
- Click on Show Recovered Files under Recover.
- A new Excel sheet will open. Only this time, you’ll see a Document Recovery tab on the left side.
- You will see the file(s) that were last automatically saved under Available Files.
- Right-click on the file you wish to preserve and choose Save As… and pick a location on your drive.
Method 3. How to recover an Unsaved Excel file using AutoRecover
Your second line of defense is AutoRecover, which is useful if Document Recovery didn’t appear for some reason, most likely too much time after the initial disaster. But, before you start, you need to ensure hidden files are visible on your computer.
How to enable hidden files on your PC
- Open the Start menu or press your Windows key.
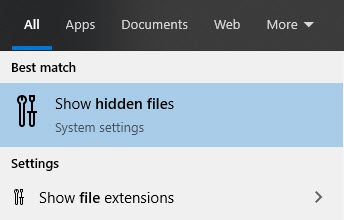
- Start typing ‘hidden files’ until an option named Show hidden files appears, and click on it.
- Ensure that there is a checkmark in front of Change settings to show file extensions.
- Click on Show settings.
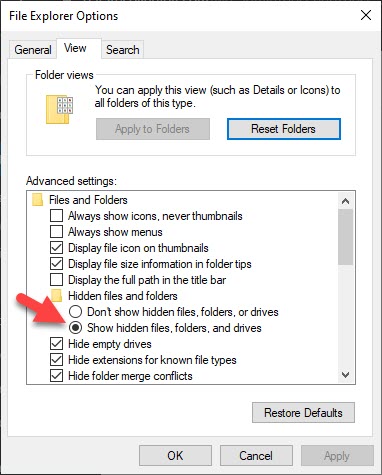
- Choose the option Show hidden files, folders, and drives if it isn’t.
- Click on OK.
How to enable Excel AutoRecover
Before you go further, it is important to verify that AutoRecover is turned on. It should be, by default, but if it isn’t, you need to enable and configure the feature to prevent future disasters. Also, AutoRecover works with Microsoft Word as well, if you ever need that sort of help. Here are the steps to enable Excel AutoRecover feature –
- Open Microsoft Excel.
- Choose on File in the top left corner.
- Click on Options.
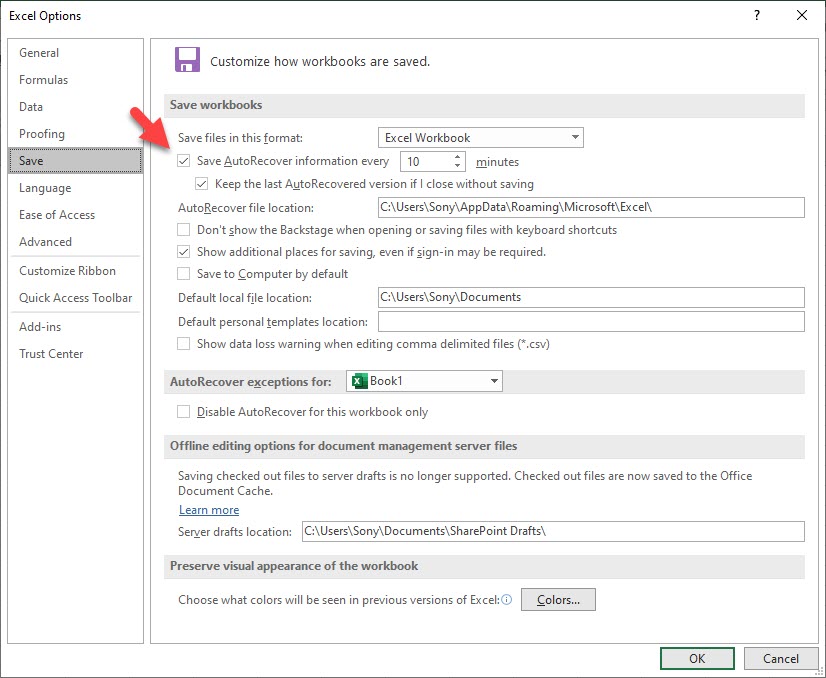
- Choose the Save tab on the left.
- Notice the line Save AutoRecover information every “X” minutes. “X” represents a time interval in minutes your file will be automatically saved. Make sure the box in front of it is checked, and change the number if you wish.
- Make sure the box in front of Keep the last autosaved version if I close without saving is checked.
Steps to restore an Excel file with AutoRecover
- Open Microsoft Excel.
- Click on File in the top left corner.
- Choose the Open option in the left tab.
- Recent should be on top of the list. Spot the Recover Unsaved Workbooks at the bottom of the tab, and click on it.
- A new window named Open will pop up. If there are multiple files, look for the one named similarly to Book1.xlsb. That’s just an example, your file might have the name of the original file or have a list of numbers in it, but it’s the extension you need to look for.
- Double-click on the file or highlight it and click Open.
- Once the file opens, you can go through the process of saving it as a normal Microsoft Excel document. To do that, click on File, then Save As, then choose Computer, and choose an output location.
Method 4. Using Temporary Files to recover Excel files directly
We’ll present two ways to use this feature, so choose whichever is more your style. Make sure you can see hidden files through the steps we outlined above.
Steps for restoring a temporary Excel file through Microsoft Excel
- Open Microsoft Excel.
- Locate File in the top left corner, and click on it.
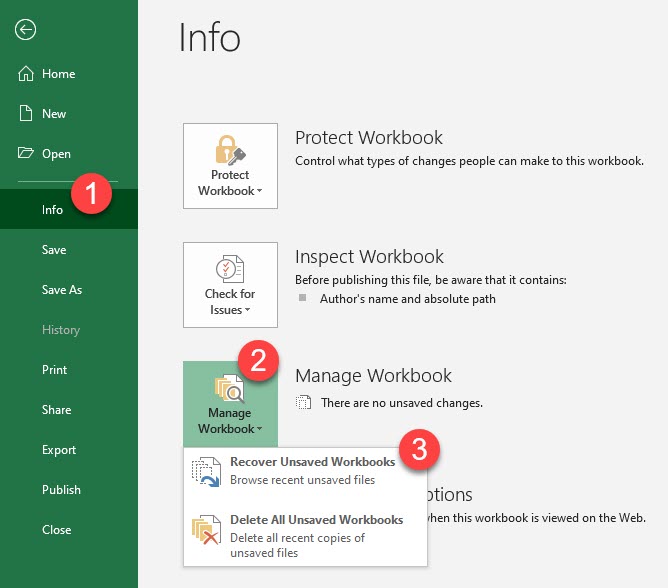
- Click Info, then Manage Workbook.
- A drop-down menu shows up. Click on Recover Unsaved Workbooks.
- A new window will pop up, and you should see the contents of the UnsavedFiles folder.
- Look for a file with an XLSB extension, It will be named something like Book1.xlsb, depending on the name of your original file, and might or might not have a long string of numbers.
- Either highlight the file and click Open in the bottom right corner, or double-click the file.
- If it was the right file, simply go ahead and click on File again, then Save As, then Computer. Now, pick the location on your drive you want to save the Excel file.
Steps for restoring a temporary Excel file directly
- Open This PC (My Computer) or Windows Explorer.
- Click on the address bar and make sure the entire address is highlighted, or delete everything in it.
- Paste C:\Users\[Admin]\AppData\Local\Microsoft\Office\UnsavedFiles (Replace [Admin] with the actual username of your Microsoft or a local account you use to log in).
- You are redirected to the UnsavedFiles folder.
- Locate the file that is named something like Book1.xlsb. It can have a completely different name, but the extension stays the same, so search for that.
- Copy it to the desktop for convenience. Open Microsoft Excel and try to drag-and-drop. If that doesn’t work, click on File, then Open, and browse for it on desktop.
Method 5. How to recover an Excel file with a data recovery software
Excel files can be recovered with the help of data recovery software. You can use a good document recovery software of your choice. For a demonstration, we are going to use a software known as Piriform Recuva.
Piriform Recuva is free to download, lightweight, extremely easy to use, and also allows you to recover an unlimited number of files. We chose this software for one of its key features. It allows you to scan for file types instead of browsing for everything, and then letting you sift through the results to find documents. That will save you a lot of time, which is appreciated when you need to get back to work on an Excel file. We have a guide on how to use Recuva if you want to know more about this tool.
Steps to recover Excel files using Recuva
- Download Piriform Recuva.
- Install it, and launch the software either from desktop or through the Start bar.
- In the top right corner, choose Documents as the file type to scan for. Change the drive letter if needed, although it should be C: by default.
- When you are ready to start scanning, click Next.
- Sit back and relax while it scans.
- Once the scan is finished, browse through results. If you remember the name of your original document, start with that. If not, look for extensions such as XLS, XLSX, and XLSB.
- Is there a green circle next to the document? That means the file can be recovered without corruption.
- Either highlight or mark the files you want to recover. Click Recover Highlighted… or Recover Checked…
- Finally, pick a location to save the retrieved files. We recommend any drive except the one you recovered from.
How to recover a previous version of the Excel document
You can recover the previous version of an Excel document by following these steps –
- Open the Excel file.
- Click on File.
- Then go to Info.
- And to Version history.
- Select the file version you want to restore.
- Click on Restore.
Can you recover an Excel file online?
Yes. You can recover an Excel file online. However, it doesn’t work with a deleted Excel file because the online tools will not have access to your file system. Rather, they try to recover a damaged Excel file once you upload it to the website of your choice. RecoveryToolBox has such a tool that you can try to recover your corrupted Excel document.
