
Wondering how to recover files you erased and then emptied from the Recycle Bin? Whether the act was accidental or intentional, thinking you won’t need those files anymore, the damage is done. And, although it seems you signed a death sentence for the data when you pressed Empty Recycle Bin, that’s not the case. We discussed plenty of solutions when we talked about restoring a deleted folder in Windows 10. Let’s explore other options, here are the steps to recover files from Recycle Bin after empty.
1. Always check your Recycle Bin
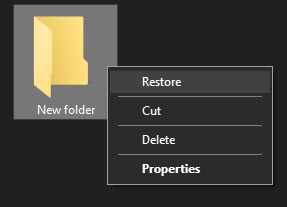
Always try the “dumbest” step first, as it could very well save you hours of effort. Thinking that you emptied, and verifying that you did are two different things. If it turns out that files are still there, do this:
- Right-click on a file or a group of files.
- Click on Restore.
- The files are now restored to their original location.
- Click and hold on a file or a group of files.
- Drag them to the desktop or a folder of your choice.
2. Stop any action on your computer immediately
Any step you take, whether it is copying files, browsing the Internet, installing new programs, or editing photos or videos, has a chance to make your files disappear forever.
Wonder why? When you empty the Recycle Bin, the files still exist in the internal storage. The computer only erases the file path that leads to those files and considers the space empty. As you continue to work on the computer, that space is slowly overwritten with new data.
3. Restoring files from an emptied Recycle Bin using Piriform Recuva
Piriform Recuva is among the best data recovery software for Windows. It is free, lightweight, easy-to-use, and efficient. It is the best choice for recently emptied Recycle Bin. Here’s how to use it.
- Download Piriform Recuva for Windows.
- Install and launch the software.
- During the first boot, you will be asked about the file type you are trying to recover.
- Click on the circle in front of All files and click Next.
- In the next window, click on the circle in front of In the Recycle Bin.
- Click on Next.
- Optional. Check the box in front of Enable Deep Scan.
The scan will last longer but will be thorough. - Click Next.
- A new window will pop up with results. You can successfully recover files that have a green circle in front of them. The files marked with a red circle are corrupted or fractured and have a lesser chance of restoration.
- Check the boxes in front of the files you want to restore.
- Click on Recover… in the bottom right corner.
- Choose a location to save the newly recovered files.
4. Steps to recover files from Recycle Bin via EaseUS Data Recovery Wizard
EaseUS Data Recovery Wizard has certainly earned a spot among the top 10 recovery software for PC. It is a paid software, has a sleek UI, and has a much better recovery rate than Recuva. Plus, the company offers its users to restore up to 2 GB of any type of file for free. This is how it works.
- Download EaseUS Data Recovery Wizard for Windows.
- Install and run the software.
- Hover over the Recycle Bin option.
- Click on Scan.
- Let the scanning process finish.
- Files are sorted into categories/folders in the menu on the left.
- You can right-click on any file and choose Preview or Recover.
- If you don’t like the interface, mark the discovered files using the checkbox at the top.
- Click on Recover in the bottom right corner.
- Browse through the files, keep some, and erase the rest again.
5. How to Use Windows File History to Recover Files from the Recycle Bin?
Windows File History is an inbuilt feature that helps you recover files from the recycle bin after it has been emptied. This function generates backups of your data automatically and allows you to restore prior versions. While the article presents methods via third-party software, it is critical to investigate the native file recovery alternatives available on Windows. Here’s how to restore files from the recycle bin using Windows File History:
- Press the “Windows key + E” to launch the File Explorer.
- Go to the folder that contains the deleted file’s original location.
- Right-click on the folder and select “Restore previous versions” from the context menu.
- A list of previous versions of the folder will appear. Select the version closest to the time before you emptied the recycle bin.
- Press the “Restore” button to restore the folder to the version you choose. The folder’s contents will be returned to where they originally belonged.
- If you are unsure of the exact folder location or want to recover individual files, follow these steps:
- Right-click on the folder where the deleted file was originally located and select “Properties.”
- In the Properties window, navigate to the “Previous Versions” tab.
- A list of previous versions of the folder will be displayed. Select the version closest to the time before you emptied the recycle bin.
- Click the “Open” button to view the contents of the selected version.
- To restore the necessary files, copy them to another folder on your PC.
Using Windows File History can be a convenient and effective way to recover files from the recycle bin, especially if you have enabled the feature and regularly backed up your files. It’s always recommended to maintain a backup routine to safeguard your important data and minimize the risk of permanent loss.
6. Hire a data recovery company
If neither of the software above worked, you have two choices.
- Try another software, preferably paid/premium.
- Consider professional hard drive data recovery if the files are extremely important. For that, we recommend looking at the reviews and reputation and finding a local data recovery company
If you cannot access your recycle bin, you might want to recover the corrupted recycle bin before retrying the above methods.
