Looking for a way to recover deleted messages on Facebook? No wonder – some of them must be funny, nostalgic, or outright important. However, you must distinguish between messages you deleted and those you simply want for safekeeping. Obviously, the latter case has a much larger success rate, although the process is identical. Also, we’d like to mention that you have a chance to restore all messages from the start of your account to the date and time you requested data. And, in case you deleted a recent conversation, it’s recommended you act as fast as possible. With that in mind, here’s how to restore Facebook messages.
Steps to recover Facebook messages
You’ll take advantage of Facebook’s obsession with collecting data. Additionally, you have a chance to choose between doing steps online, or inside an offline copy. We’ll guide you through the entire process, don’t fret.
- Log in to your Facebook account.
If you have trouble logging in, you can recover a Facebook account with an old password, username, or even if in case it was disabled. - Click on the down arrow in the top right corner.
- From a drop-down menu, choose Settings & Privacy.
- Now, choose Settings.
- In the menu on the left side, select Your Facebook Information.
- You now have two options to choose from.
Online and offline options for message recovery
- Click on Access Your Information.
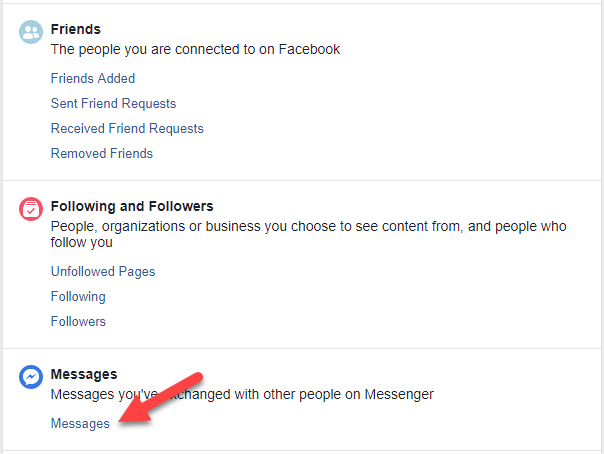
- Click on Messages.
- Once the tab expands, click on Your Messages.
- Click on the person whose messages you’re trying to retrieve.
- See if the messages you deleted are still there. If they aren’t, follow the steps below.
- Click on Download Your Information.
- Under the Data Range, choose a date range. If you want to restore messages on Facebook since you created the account, leave it on All of my data.
- We recommend keeping the Format on HTML.
- Since your focus is not on downloading images or videos, Media Quality is not that important. If you are in a hurry, you can choose Low.
- Click on Deselect all in the top right corner.
- Now, select Messages by putting a checkmark in the far right corner.
- Click on Create File in the top right corner.
- You’ll get a report: Your file is being processed.
If you put a short date range, chose Messages only, and put Media Quality on Low, the process should be pretty fast.
If you requested a copy of your entire account since its conception, the file can be upward of 3 GB in size, which takes a while. - Once the copy is ready, you’ll get a Facebook notification saying: Your Facebook data is ready for download.
- Click on the notification, then click on Download.
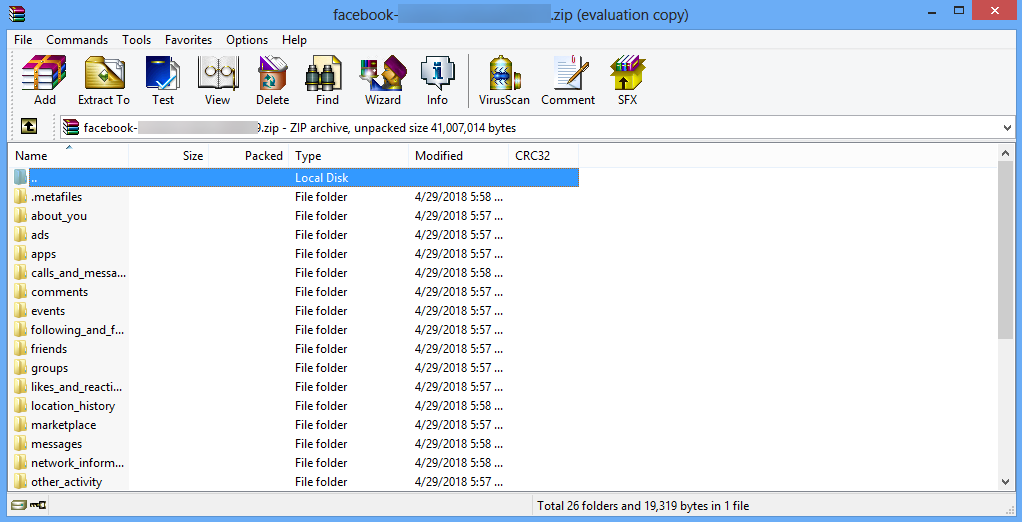
- The file will be in form of a ZIP archive.
- Extract the files from the ZIP archive to your desktop or a location of your choice.
- In the root (base) folder, look for a file titled index.html.
The file might be called index, depending on if you made extensions visible. - Open the file by double-clicking on it, and your default browser should open it.
Alternatively, you can open the browser tab, then drag the index.html file to it. - If you checked multiple information types look for Messages. Otherwise, Messages will be the only option.
- Click on the Messages hyperlink underneath.
- You’ll see a list of people you’ve interacted with on the left.
- Use Ctrl (Control) + F to search for specific words in conversations.
Finally, you hopefully got back the Facebook chat messages you either thought were lost, or completely forgot you sent or received. Either way, this should cheer you up, and we’re happy for you.
How to recover deleted messages on Facebook
This is a touchy subject, and there is no definitive answer to the question. That’s because once you actually delete them manually, Facebook warns you they’ll be gone forever, and the damage will be irreparable. However, you’ll be suggested another way, and that is archiving your conversations. In case you use this option, you can easily get it back by means we’ll talk about today. Additionally, once you receive new ones from the person itself, they’ll be added on top. There are a few other ways to try and access them, and you should try them all before completely giving up.
We’re human, and feelings sometimes overpower us and we make a rash decision. Maybe you’ve broken up a friendship or a relationship, or gotten into a fight, and deleted some messages or the entire conversations. Unfortunately, once you’ve cooled off in a few days or a week, you’d like to re-read it to make things right. But are they gone forever, and how can you actually access them? Thankfully, Facebook themselves provided a viable option which is your best bet at the same time, and that is Facebook Archive you can download to your computer. We’ll guide you through the process, although you need to wait for them to do their part, which can take a day or more. Let’s start.
- Log into your Facebook account. This is the first logical step, just make sure you’re logged into the right one if you use multiple.
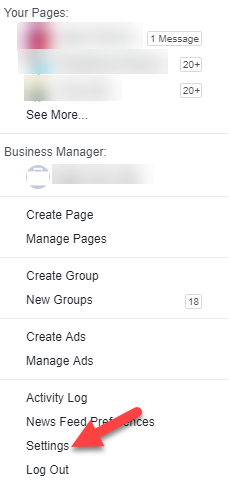
- Click the (Down) arrow in the top right corner. A drop-down menu opens up.
- Choose Settings.
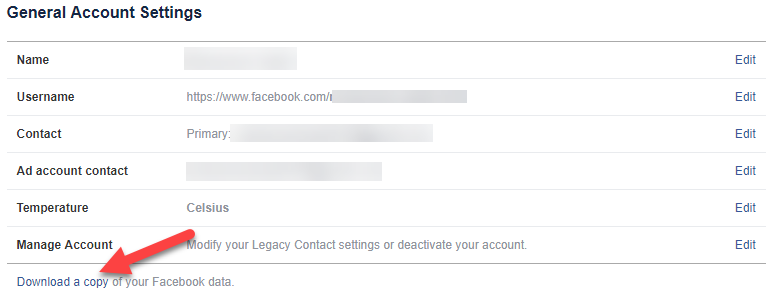
- Look below Manage account. There is Download a copy of your Facebook data written underneath.
- Follow the link.
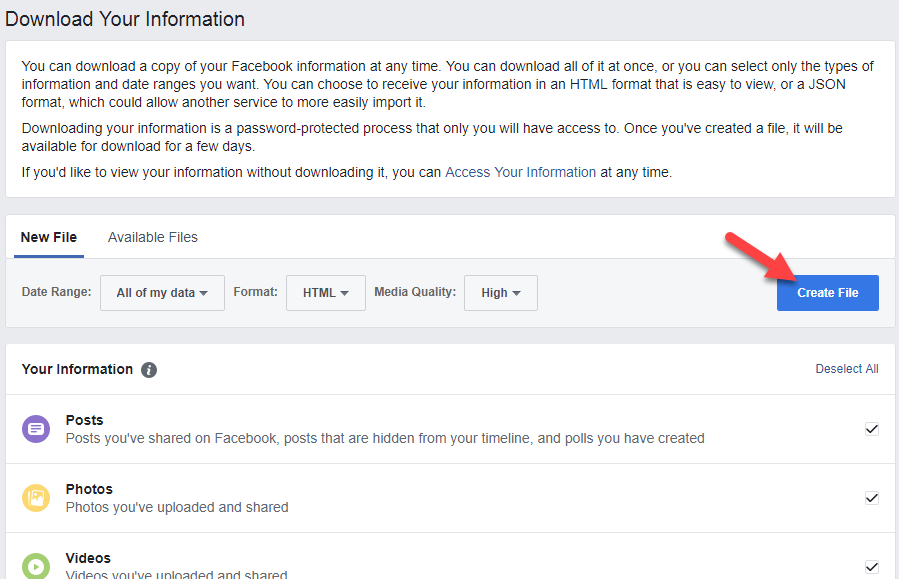
- Another page opens up, and you get to choose. You can choose to download all of your data, or if you’re looking for a conversation (or images and videos) between specific dates, go ahead and choose that. The list is very comprehensive and includes followers, likes, friends, comments you left, groups you belong to, and much, much more. This is obvious, as you’ve spent an important chunk of your time on Facebook doing exactly this – connecting with other people.
- Click on Create File after you’ve chosen the format and quality. Of course, for best results, you should put the Media Quality on High. However, if that’s not what you’re after, you can place it on medium or low, or skip it altogether. When it comes to the format choice, HTML is your best bet, as you can open it in your browser later, and easily search and scroll. Ultimately, the choice is yours.
- Facebook will start preparing your file for download. There is nothing else you can do now but wait. They’ll usually notify you via e-mail or right away if it’s not big in size. Keep in mind, an account you’ve used for a number of years and with full data included can take up to 2 to 3 GB!
As soon as the data preparation is complete, you will receive a notification from Facebook saying that your Facebook data is ready for download. Follow the link.
You will then reach a page where you can click on the “Download” button and download your entire Facebook data including your lost messages, posts, likes, reactions and almost everything you did on Facebook.
- Download your data. It’s in form of a zip (compressed) archive. Once you unpack it, you’ll see multiple folders, which are essentially categories for easy searches.
- Open index.html. It might be called index only, depending if you have visible extensions or not. Once you do, it looks like a bare-bones version of your Facebook account, with choices on the left. Use CTRL + F to open a search bar for easy navigation through the file.
- Enjoy the things you forgot or thought were lost. The data is so detailed, that you’ll probably find things you couldn’t in any other way. For example, you can see the exact date you became a friend with a person on Facebook. Furthermore, you can see all name changes, groups, interests and much, much more. Even though you were looking to restore deleted messages, you can enjoy the moments you shared with people in the past as well.
How to delete messages on Facebook
We need to cover the other end of the spectrum as well. If you’re wondering why is that, just remember your last embarrassing moment – you sent a message when you were drunk, or completely by accident. You wanted to stop the person from receiving it, but unless you were physically there to take their phone away (which you shouldn’t do – ever), there is no other way. Well, we’re here to tell you that there actually is
People find themselves in these situations very often, so they’ve developed a tactic that works.
- It’s important to realize – messages you already sent cannot be stopped from arriving at the person you sent them to.. You cannot un-send them, at least not on Facebook. Additionally, if they have e-mail notifications turned on, they’ll receive it that way as well. This means that even if you delete the message or the entire conversation on your end, the other person will still see it.
- But don’t lose hope – other people that were in the same situation found a fix.
- Open the message you sent by accident > Mark it as Spam or Abuse by going to Actions > Delete it on your end > Then, deactivate (or disable) your account > Reactivate the account at a later time, once you’re sure the danger of the other person seeing it has passed.
- This is not a 100% working method. As Facebook continuously improves and updates both the main page and the Messenger, things get fixed. There might be another method on the rise at that moment, while it stops working in a short time after that. But – it’s better than nothing, at least you have a fighting chance.
To conclude things, you’ve just realized how important thinking beforehand is for your nerves. You’ll save yourself a lot of trouble if you just calm down, and make a decision without the influence of emotions. Delete only if you really want to, and if you can withstand never having access again. Prevent drunk-texting if you have a habit of that by downloading some of the many apps on iTunes or Google Play. Finally, downloading your archive can be a good way to remember and cherish the past, as well as see things you’ve completely forgotten about.
 As soon as the data preparation is complete, you will receive a notification from Facebook saying that your Facebook data is ready for download. Follow the link.
 You will then reach a page where you can click on the “Download” button and download your entire Facebook data including your lost messages, posts, likes, reactions and almost everything you did on Facebook.
